Tampilkan postingan dengan label gallery wall. Tampilkan semua postingan

Jumat, 11 Oktober 2013

, , , , , , , , ,

How To Create A Wall Display With Vintage Silver Trays


Creating a wall display of silver serving trays is easier than you may think!
I love this look. Creating this display was one of the things that I most looked forward
 to when I was redecorating my dining room. I already had a small collection of silver 
plated serving trays that I had purchased at thrift shops. All I had to do was figure 
out where and how I wanted to hang them. Here is how I created the look.

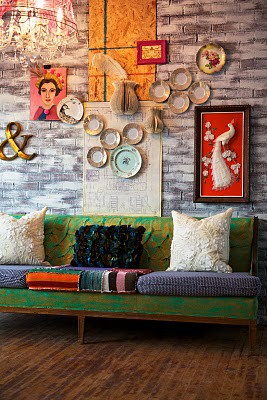
I had the room painted sage green with one opposing wall painted deep plum.
After I had my furniture in place I decided that the trays would look great surrounding 
my baker's rack on the plum wall. I liked the idea of the contrast of vintage silver against
the deep plum. Because I was using different shaped trays, I held each tray up against the
wall to determine its placement and spacing. I didn't measure or do anything fancy, I
just decided which tray I liked next to which, and then estimated where I wanted to 
hang them.  This was important to do because the oblong trays could have been hung
either vertically or horizontally. I simply held each tray up against the wall and turned
it every which way until I was pleased with the order and placement.

Once I decided the placement of the trays on the wall, it was time to give each tray a
hook on the reverse side so that I could hang them. Here's how I did it.


Supplies needed: E6000 adhesive and large paper clips. That's it!


Before attaching my hooks, I washed my trays but I did not polish them. I wanted them
to retain their tarnished vintage finish so I just washed them in hot soapy dish water
and dried them. If you want your trays to be shiny, now is the time to polish them. 


For the hooks we will use E6000 adhesive and large paper clips. 
You can buy E6000 at most craft and hardware stores.


On the reverse side of your tray, determine where the center is. You can do this by
measuring with a ruler or measuring tape. Apply a long heavy bead of E6000
adhesive to that center spot near the edge or rim of the tray. If you tray is recessed like 
mine it the photo is, you will need to attach your hook not at the very lip of the tray, but at
the flat bottom area. This is so that the tray will hang flat against your wall. 


Pick up a large paper clip and gently bend it just slightly so that you separate the small 
bend from the large bend as shown in the photo. In the photo I am holding the large bend.
The smaller bend is what will go into the glue. The large bend will be the hook for the nail. 


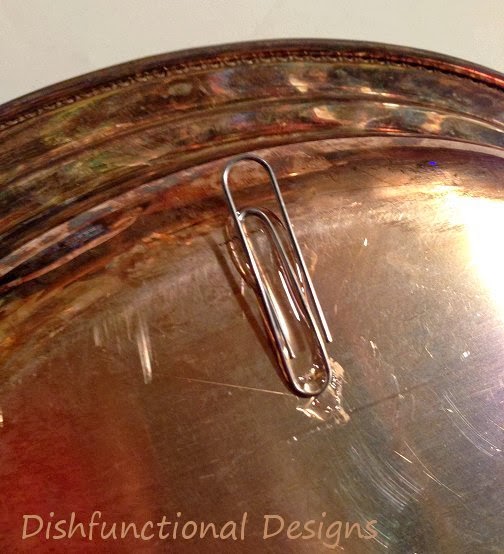
Press the small bend of the paper clip into the adhesive that you put on the back of
your tray until the small bend of the clip is completely entrenched in adhesive. 
Allow adhesive to dry overnight.


Here is what it should look like. Once the adhesive has completely dried you 
can hang your trays!


Hammer your nail into your wall and then hang the tray on the nail by
hooking the large bend of the paper clip onto the nail. That's it! 
The size of the nail you use will be determined by the material that
your wall is made from and also the size and weight of your tray. For
large heavy trays you should use larger fasteners or mollys/anchors.


My completed display.


It's THAT easy!


Pin this post!


What do you think?


Rabu, 20 Juni 2012

, , , , , , , , , ,

Create An Eclectic Gallery Wall!


A gallery wall is a great way to add personalization, interest, color, and style to your home or work space. One easy way to make a gallery wall is to create one around a central theme. Old maps, vintage flea market art, needlepoint samplers, vintage paint by numbers - all make interesting themes for gallery walls. 

What's your passion? Gallery walls are a great way to display personal collections: don't keep those vintage family photos in a drawer - display them as a gallery wall with a collection of unique frames. Aside from displaying art that has a similar theme, another way to create a gallery grouping is to create a display that is tied together by color. 

Here are some other ideas of gallery wall groupings:
 Vintage flea market & thrift shop art - makes a great Bohemian style display!
Old maps: this is even better if they have a personal meaning: how about maps of all the places you've lived or visited?
Hand stitched needlepoint samplers
Children's art - as well as your own childhood art
Favorite record album covers (many shops sell frames specifically for these!) 
Vintage advertising

Sheet music of favorite songs
Vintage art from favorite old books
Vintage family photos
Groupings of something you like or collect, whether it be frogs, sailboats, botanical prints, leaves, etc.

Add mirrors for depth and sparkle


A collection of vintage prints and needlepoint.


Create a display with a common theme, in this case, hand-stitched samplers.


A collection of vintage floral prints.


 A tightly displayed collection


Nicely coordinating collection from Pop of Pretty


The variety of frames used here adds interest
Another display with a common theme: vintage crate labels.


Beautiful office space. The brightly colored wall really sets off the black and white photos and frames.


(via skonahem)
An interesting display


Another arrangement of vintage photos in black frames


Ceiling to headboard bedroom display


Photo via Pottery Barn


This moody display is almost fantasy-like


I love the look of this mixed art collection that spans from ceiling to sofa height.


How To
When I created my own gallery wall I just hung my largest "focal" picture first, and then worked around that central image, holding the pictures up in various spots one at a time until I created the balance I wanted and had them all hung. For those of you who like to have things perfectly spaced, you can create templates from paper in the sizes of your frames  and tape those to your wall to get an idea of what your grouping will look like before committing with hammer and nails. Time consuming? Yes, but worth it if exact and perfectly balanced is the look you are going for, or if you are covering an entire wall. 


An example of using paper templates from BHG


I much prefer a unplanned, bohemian approach and was happy to have all of my artwork hung with just a few minutes of thinking about what looked best next to what. Check out some of these grouping arrangements for ideas below.


Each of the arrangements shown above is well balanced in response to the wall sizes and size of decor.


What arrangement you choose will have to correlate with what size art you are hanging. 


Here are some final gallery wall images to inspire you, in my favorite of all styles, Eclectic Bohemian!


I love the boho style of the artwork displayed in this narrow hall


This gallery wall was created around the room's architecture 


Bedroom wall display


via New York magazine


Via~Pinterest
A mix of art and plates


I love everything about this space: the books, bedding, wallpaper and art.


Old family photos


Well coordinated color ties the wall art to the rest of the decor.


Barn decor


Moody browns and neutrals


I love the use of vibrant colors in this display.


Again, the wonderful wall color accentuates the entire look.


Quite a collection!


What do you think?